Sunday 23 September 2007

Basic Vanilla Cupcake


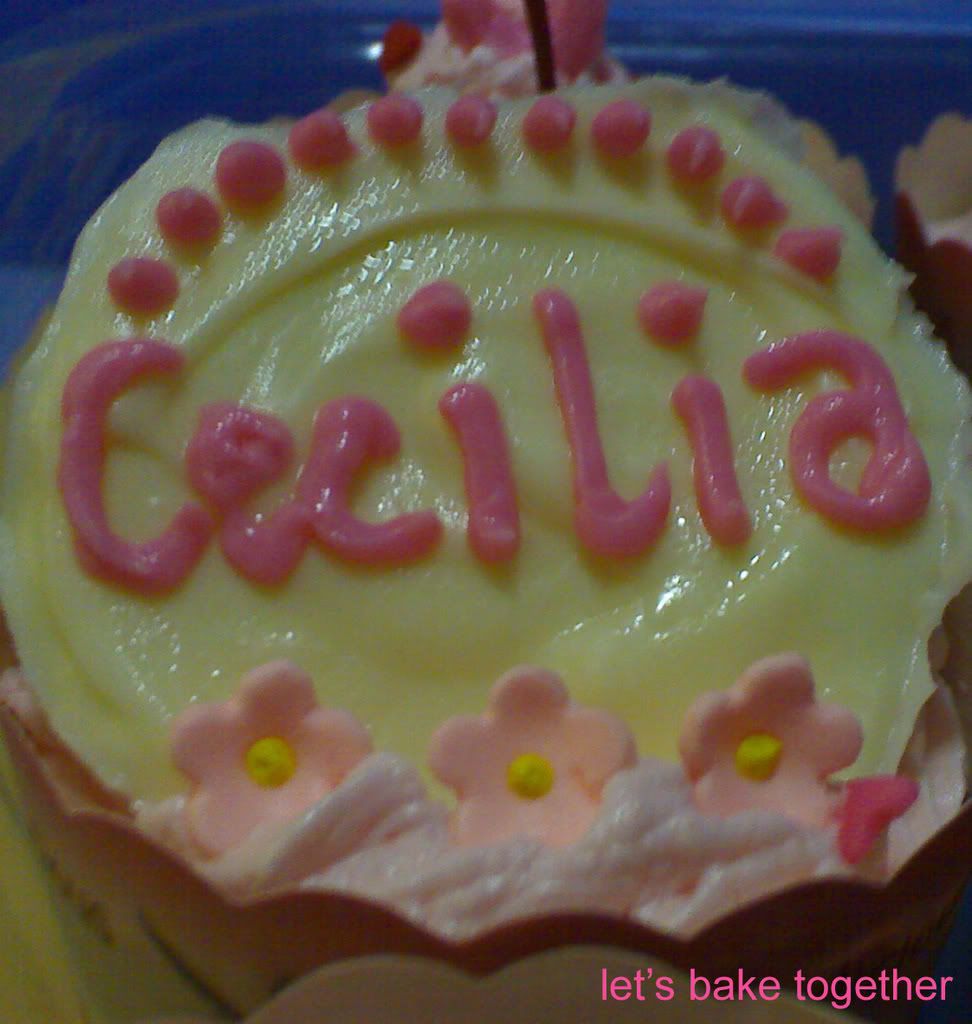
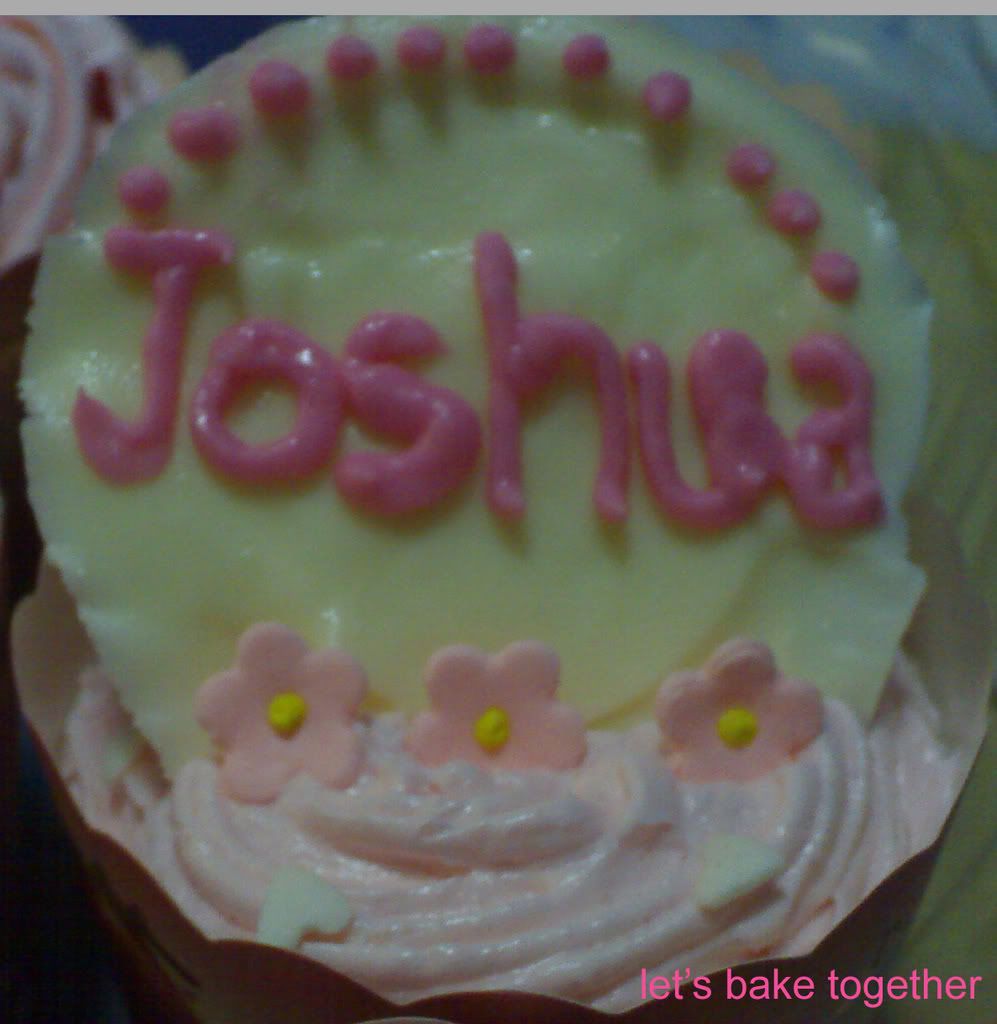
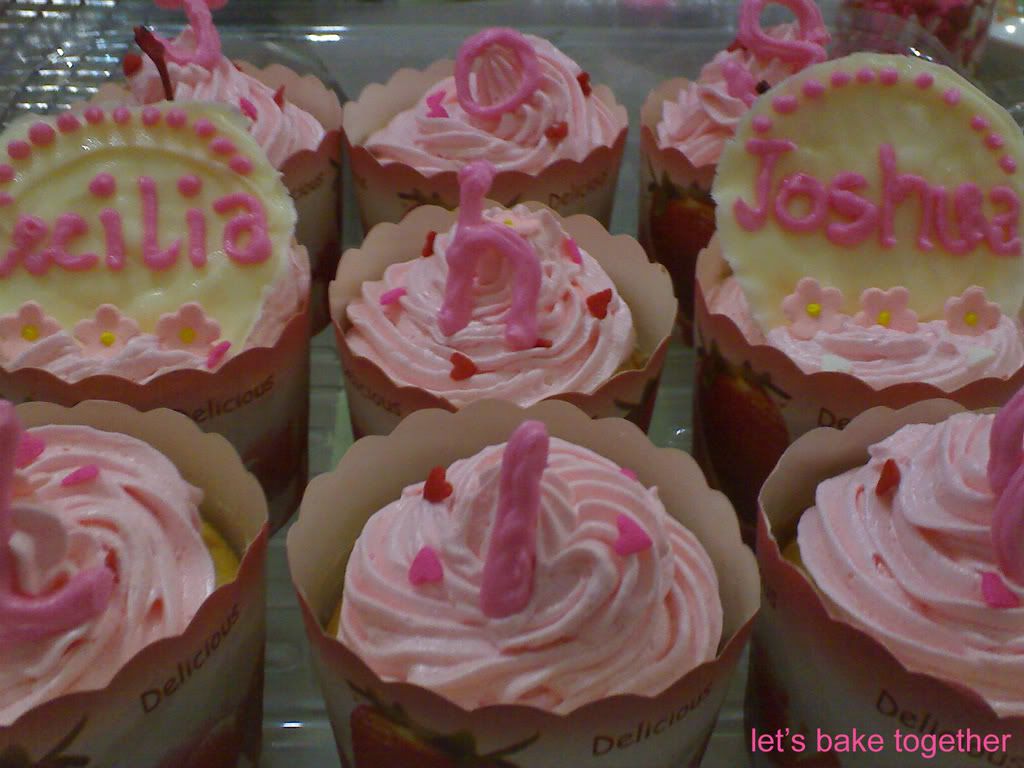
I was told the night before the party. My boyfriend's bother called him after 9pm that he's having gathering at his mother's place to celebrate his son's 1st birthday. I was planning to buy some present to give his little son, Joshua, next week. But I felt that going there with empty handed is just not right. So, on the way home late night I decided to make some cupcakes. Cupcakes is the easiest to make and not to mention pretty as well :) Pretty cupcakes are ideal for emergency *hahaha*


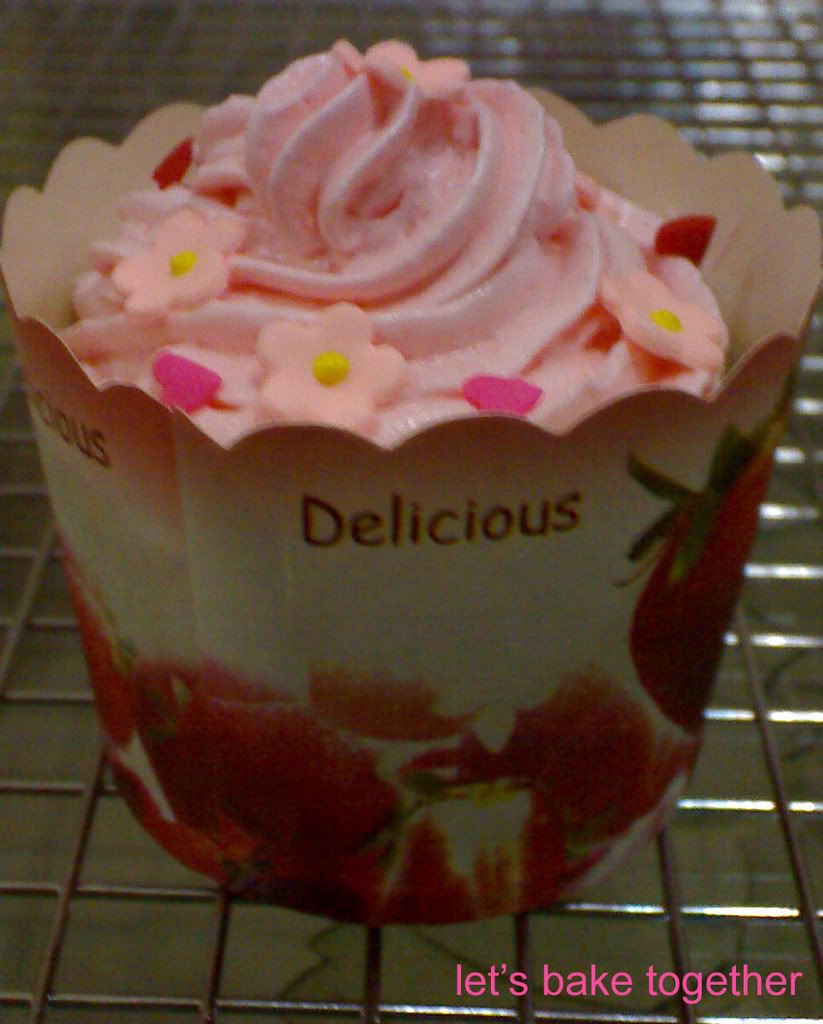
Once again, before going to bed I opened my magic book *hihihi* and the most basic vanilla cupcake picked because I have all the ingredients. The question left was "how am I supposed to dress these cupcakes beautifully?" I like pink, I have Pink Cooking Chocolate in my magic box and left over whipping cream. Also I wanted to combine with Cecilia's. So, pink is perfect. I picked Chocolate Buttercream for the frosting. Also decorated with melted chocolate. All edible for the cupcake :). I didn't think about Joshua supposed to have blue colour :p It was too late already when it ran across my mind when I was about to leave *hihihi*

Basic Vanilla Cupcake
Source: cupcake creations


Ingredients:
5 oz (150 g) Butter, softened
5 oz (150 g / 2/3 cup) Superfine (caster) sugar
6 oz (175 g) Self raising flour *I substituted with 1 1/2 cups flour + 3/4 tsp salt + 2 1/4 tsps baking powder*
3 Eggs
1 tsp Vanilla extract
*I added 5 tbsps whipping cream, cuz I panic when seeing the mixture is too thick :p, lucky it turned out just fine*


Directions:
1. Preheat the oven to 350 F (180 C).
2. Line a 12 cup cake pan, with cup cake papers.
3. Crack the eggs into a cup and beat lightly with a fork.
4. Place all ingredients in a large bowl.
5. Beat with an electric mixer for 2 minutes, until light and creamy.
6. Divide the mixture evenly between the cake cases.
7. Bake for 18-20 minutes until risen and firm to touch.
8. Allow to cool for a few minutes and then transfer to a wire rack.
9. Allow to cool fully before icing.


Frosting:
Pink Cooking Chocolate, coarsely chopped *I didn't do any measurement just appx. at least double the size of the cream :p*
1/4 cup Whipping cream
1/2 cup Icing sugar *I use caster sugar and blend until it becomes like powder*
1/2 cup Butter


Bring the cream to just boil, pour into the chocolate. Stir until smooth. Allow to cool. Beat butter and chocolate, add in icing sugar. Beat until smooth.

Banana Cake

At the first I just wanted to relax at home or go for body treatment. Hm... message.... :) I really need it. Especially my legs screaming out loud for the last few days. The effect of 5 minutes running catching my bus to office hehehe... *Quick Excercise, that's what my boss call it from seeing me trying to catch my breath every morning* hahaha. It's been a while i don't go to that place. But I don't feel like driving that morning, maybe next week I'll call up to schedule :p


So, this morning my mom step into the kitchen. She always does that when my grandmom not around. She hates seeing many things and unused sitting on her kitchen. And she was about to throw some over cooked banana into the bin. My baking sense instantly jumped in and stopped her *hihihi* I took the banana and ran upstair flipping my recipe book. And I picked this recipe cause I have all the ingredients in my magic box *hahaha*, that's where I put all my baking needs, away from my grandmom's reach *hahaha* She loves to move thing and misplace, and by the time you need it you'll have to go into each cabinet. And since they're alway not in your sight you forget and they're just stood there until the expiration date :p


The banana cake was a hit. Even my mom who usually comments "so so" for every cake I've made so far, this time she said this is good and just like the one sold at the cake shop *I put up my happiest smile ever to her :)* The is very soft and not to sweet. And it's even tastier if you serve with grated cheddar cheese :) Here's the recipe.


Banana Cake
Source: sahabat nestle

Ingredients:
250 g Banana, mashed *I mashed about 3 bananas, that's what left :)*
3 sdm Nestle milk CAP NONA *I used other brand of condensed milk*
150 g Butter
175 g Powdered sugar
4 Egg yolks
4 Egg whites
Sift together:
200 g All purpose flour
25 g Nestle Dancow Fullcream
1/2 tsp Baking soda
1 tsp Baking powder
50 g Sliced almonds for sprinkle *I skipped this one*

Directions:
1. Mix mashed banana and condensed milk, set aside.
2. Put butter and sugar in the electric mixer and beat until soften. Add in the egg yolks one at a time and continuing to beat.
3. Add in the banana mixture alternately with flour mixture. Mix well.
4. Using the electric mixer, beat the egg whites until stiff. Fold into the mixture and mix well.
5. Pour into the greased 22 cm loaf pan. Sprinkle with almonds.
6. Bake in the oven with 180 C for 45 minutes. *my oven takes around 10 minutes longer* So be sure you keep checking the cake maybe your oven takes shorter or longer baking time.
7. Take out from the oven and let it cool.

Saturday 22 September 2007

Monday 17 September 2007

Spiegeleikuchen

This is what I like most from Monday morning... I can have time to browse or post my baking *hahaha* maybe because of some people carry over the weekend mode so the office is a quiet peacefully morning :p
As I promised to post the Spiegeleikuchen made last Saturday, now here we go...
I took the recipe from Anne's kitchen. Same as her, I was also falling in love with the picture right away and curious what it tastes at the same time. So I've decided when my baking mode is back on, I'll definitely choose this one first *hihihi...can't wait to taste*


I followed the recipe gram by gram. I like everything, the cake, the sour cream pudding and the peach *I used peach instead of apricot, cuz that's what I found on the supermarket rack :p* But the Tortenguss which can be replaced by Indonesian agar-agar turned out too hard. Most comments I got was basically the same... "hmm...yummy, but the Agar-agar is too hard" :( Don't know if the original Tortenguss will be like this or not. When I was preparing the last layer, the Agar-agar, I was already in doubt it's gonna be hard. The recipe called for 2 packages with 500ml water. I even added 150ml more and about 1 cup of sugar *most of my family like sweet than sour* If I'm gonna make this cake again next time, I think 1 package of Agar-agar is more likeable :)


One more thing, since I don't have 28x40 cm pan I used one square pan 28x28 cm. Afraid of the cake being too thick and takes long time to bake, in addition I used one more smaller round pan. Of course the peaches wouldn't be enough *dooh... why didn't I think of that earlier* hehehe Lucky I was making the jelly (posted earlier) at the same time and steal some mandarin oranges *hihihi*, and taadda........... Spiegeleikuchen changes in the meaning *hahaha* no longer as Indonesian Telor Ceplok but Bulan Sabit :p Me and my boyfriend think that maybe next time to have any other fruits which is fresh and soft and of course suit to our taste. And once again I think the meaning changes *hahaha*


Spiegeleikuchen

Source : Mba Retno (taken from Anne's kitchen, translated by me *hihihi*)


Bahan:
5 Eggs
250 g butter
250 g Sugar
250 g All purpose flour
1 bks backpulver/baking powder
500 ml Milk
1 bks Vanille puddingpulver
500 g atau 600 g schmand/sour cream
2 bks Tortenguss atau agar-agar * I suggest 1 package of agar-agar
1 Big Can of Apricot (reserve the syrup of 250 ml)
250 ml apfelsaft/Apple juice

Direction:

Layer 1 (cake): Beat 5 eggs and sugar using an electric mixer in high speed for 10 minutes. Then add butter and continue to beat. Add in flour and backpulver. Mix well. Pour the mixture into prepared 28x40 cm pan. Oven in 200 C for 15-20 minutes. While the cake is baking, prepare the layer 2 (white)

Layer 2 (white): Mix the vanille puddingpulver with 2 tbsp of sugar, and pour the milk into the puddingpulver little by little or in steady stream while keep stirring until well mixed. Bring to boil and thickenned. Set out from the heat and pour in the sour cream/schmand, stirring to mix well. Pour the mixture onto the cake (layer 1), put in the oven again and bake for another 15 minutes. Wait for the cake to cool and arrange the apricots on the white layer.

Layer 3 (Clear): Mix the Tortenguss or Agar-agar with reserved apricot syrup (250 ml) and 250 ml apfelsaftApple juice. Bring to boil and pour over the apricots.

Sunday 16 September 2007

Pretty, Yummy, Fresh Jelly


It's been quite awhile not getting myself messy in the kitchen :p Yesterday I was like taking revenge, around 130 pretty, yummy and fresh jellies plus 2 spiegeleikuchen. By the time I finished, I was so exhausted and no more power left in me to fix myself for saturday night :( So, when my boyfriend came, I just simply took shower and got into my favorite loose short and t-shirt *hehehe*, ooh not to mention... in my natural beauty *hahaha* nothing covered my face. Can you imagine how awful was that? :p

The jelly or konyaku as I always named everything with jelly *hihihi* is the easiest to make. What took me so long cuz I don't have enough ice cream cups for all 10 packages of Nutrigel. That's took me long time to wait the jellies to set and took out from the cup and began to fill the cups again *hiks hiks hiks* I post the jelly first, for the spiegeleikuchen gotta be later on...don't know when for sure *giggle*

Pretty, Yummy, Fresh Jelly

All you need is:

Nutrigel of different flavours, follow the instruction for cooking. Cut less the sugar for less sweet if you want. That's what I did.

Fresh fruits cut in cubes. You can add in any fruits you like. I put in mango, kiwi, strawberry, canned mandarin, honeydew and nata de coco. For me those fruits have the perfect colour for jellies :) For those to have less huzzle can use canned mixed fruits but I think it won't be yummier than fresh ones.

Ice cream plastic cups

Direction:

It's easy! Just drop in few fruit cubes in the cup. Prepare the jelly and pour into each cups. Let cool and refrigerate. Now you can enjoy...... :)